
Elevating your golf game to a place of consistent scoring is accomplished by doing all the little swing details very well. One of the little details of the golf swing that isn’t often discussed is the wrist action in the golf swing. Professional golfers capitalize on their wrist movement to add repeatability and predictability to their shot shapes and swings. Our guide will explain everything the wrists should do in the golf swing, how to simplify your wrist action for the greatest results, and our favorite drills to achieve ideal wrist usage every swing we make!
Wrists in the Golf Swing 101
When discussing the wrists in the golf swing you’ll often hear terms like the leading wrist or the trailing wrist.
These terms are just a golfer’s way of describing either the left or right wrist (depending on your natural orientation.)
For a right-handed player, the leading wrist is the left wrist and the trailing wrist is the right wrist (left-handed golfers reverse these).
Key Wrist Actions Defined
The wrists working properly are crucial in two specific moments of the swing:
- The Takeaway Wrist Hinge
- The Top of the Backswing (a.k.a. when your backswing finishes)
A hidden secret of the golf swing is if you get your wrists set to the correct position during the takeaway then they should stay in a great position for the Top of the Backswing, resulting in maximized contact for consistent shots and great performance.
Takeaway Wrist Action Explained
During the golf takeaway or the very beginning of your backswing, your wrist should start to hinge after your hands just past the trailing leg. This promotes a
The takeaway can be defined by two actions: hinging the wrists and body turn.
Not only does the wrist start to hinge sometime during the takeaway, we always want our amount of wrist action to match our amount of body turn.
Wrist Action Takeaway Drill
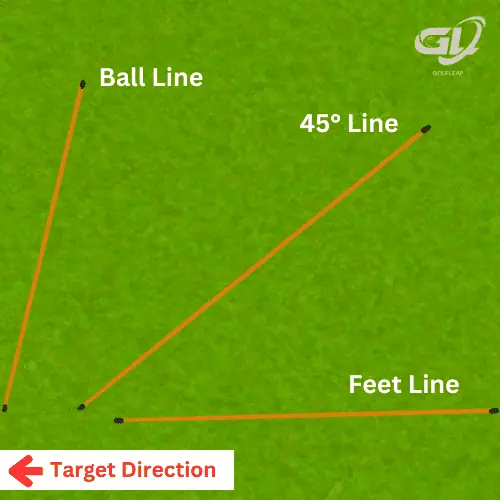
Take your normal golf stance and position three alignment sticks in the fashion we have in our example above.
- 1 pointed vertically from you representing the golf ball.
- 1 pointed at a 45° degree angle (aligning the stick from your leading heel to your trailing toes is a perfect way to do this)
- 1 pointed down your feet line (where your feet are aiming)
This divides the Takeaway into two aspects (Turning and Hinging) that should be completed at the same pace.
When the club is parallel with our feet and completely horizontal with the ground we want our wrists hinged and our body rotated/turned along with it.
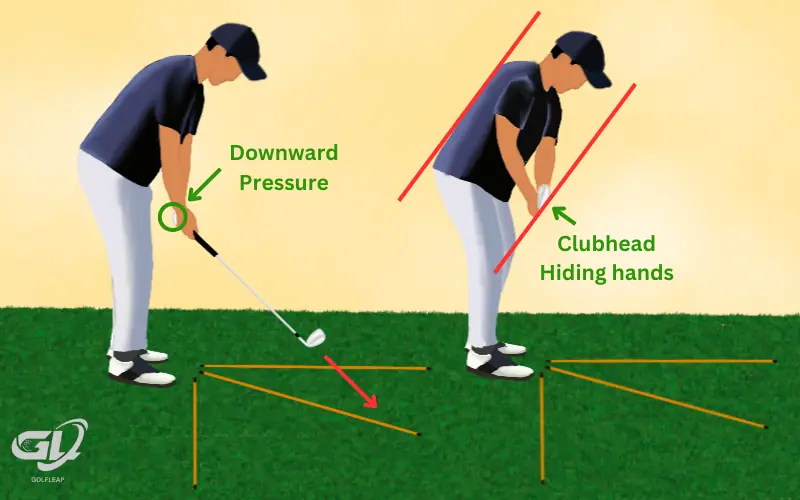
- Practice this feeling by beginning your Takeaway with the golf club matching the 45° alignment stick angle and feeling the butt-end of your leading hand apply downward pressure (creating the Hinge ).
- For the next 45° of rotation (to the club horizontal with the ground position), your wrists will continue to hinge and your body will continue to turn at the same rate.
The overarching goal of the club horizontal with the ground position is having the clubhead hide your hands with the angle of the clubface matching the angle of your spine.
This establishes the perfect wrist hinge for the Takeaway.
Top of the Backswing Wrist Action Explained
The Top of the Backswing wrist position often gets over-complicated when explained to beginners and recreational golfers.
While a Flat or Bowed position of your leading wrist at the end of the backswing produces the straightest shots, we’ll explain how perfecting your Takeaway wrist action actually creates your ideal wrist position for the backswing.
Wrist Action Backswing Drill
After implementing our Takeaway drill until you feel comfortable, you should now understand the feeling of a proper wrist hinge in the beginning of the golf swing.
From the club parallel with our feet and ground position, all we’re hoping to do is maintain the wrist angle we created in the Takeaway to the top of our backswing by accomplishing two things:
- Keeping the club in front of the center of our body.
- Using our bodily rotation to finish the golf swing and not letting our arms or wrists move more than necessary.
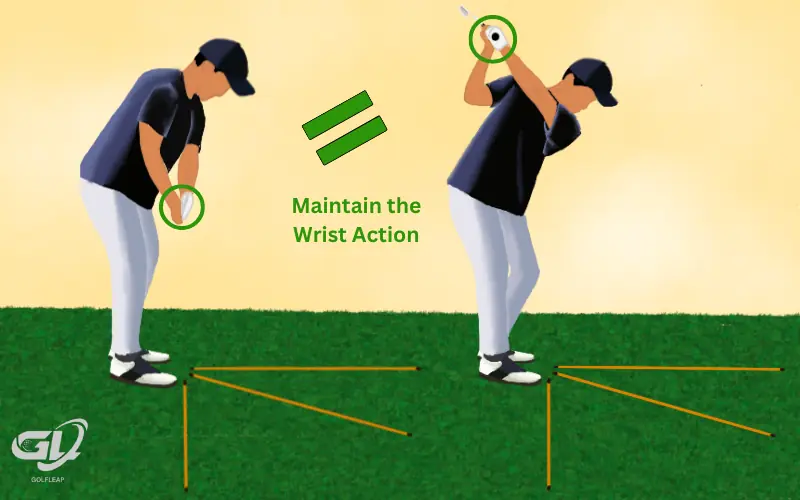
- Using the same alignment stick setup as the previous drill, practice the proper backswing wrist feeling by getting yourself to the club parallel with the feet and ground position and stopping.
- From here, use your body’s turn/rotational ability to finish the backswing (keeping your wrists in the same position) and then complete the swing to impact.
You won’t be able to finish your golf swing and make contact comfortably doing this drill unless your wrists are staying in the hinged position established by the takeaway during the backswing and unless your body’s rotation is completing your backswing.
Wrist Action Finishing the Golf Swing Explained
Now that you’ve established how your wrist action should work and feel during the Takeaway and at the Top of the Backswing, your only job to hit great golf shots is turning your body back towards the golf ball through impact.
Sure, the wrists will unhinge as you come into contact, but we want you performing this action unconsciously so you don’t accidentally flip your hands at impact for hooks or poor-contact shots.
Impact Wrist Action Drills
Here are our two favorite drills to ensure we make contact using the proper wrist action.
Throw The Ball Drill
- Holding a golf ball in your dominant hand, practice your backswing (mimicking the wrist action we’ve created from our Takeaway and Backswing drills).
- After starting your downswing from the top of the backswing, throw and release the golf ball straight downward at the ground (close to your trailing foot).
If you throw the ball behind your body accidentally, you’re releasing your wrists too early.
If you throw the ball in front of your body accidentally, you’re releasing your wrists too late!
Accomplishing the goal of throwing the ball straight downward ensures your trailing wrist (the one that moves the most during the golf swing) is releasing properly which also helps your leading wrist at the same time!
Club Upside Down Drill
Golfers who unhinge their wrists too late through impact usually slice the ball with a lot of side-spin.
Players that unhinge their wrists too early through impact usually hook the ball or have low ball flights (since the club head is moving while hitting the ball).
Take your golf club upside down (holding it just above the club head) and take some full-speed practice swings.
You should hear the grip end of the club make a Whooshing sound as it travels through the air.
- If you hear the ‘whoosh’ at the beginning of the downswing, you’ve unhinged your wrists far too early.
- If you hear the ‘whoosh’ past where you would make contact with the golf ball, you’ve unhinged your wrists far too late.
You should hear the whoosh sound right at the moment of impact (or where impact would be with the club facing the proper way).
This drill ensures you’re unhinging your wrists at the correct time for consistent contact and maximized distance and repeatability for your golf swing.
That’s the End of the Round
You made it to the end! Remember, don’t worry too much about getting the perfect amount of wrist hinge right now. Practice the drills we showed you above and eventually, you’ll develop the muscle memory to incorporate the right amount of wrist action every step of the golf swing.
