How you grip the golf club with the left hand (for the right-handed golfer) plays a critical role in controlling the club face and smoothness of your golf swing. It’s also the first step to gripping the golf club before introducing the right hand to the golf grip.
Here we will address how the left-hand grip placement is achieved and why the left hand is important in creating a quality golf swing.
For left-handed golfers, follow these steps with the right hand.
Table of Contents
Why the Left Hand Placement on The Golf Grip is Important
The left hand’s placement on the golf grip affects the control of the clubface, which determines the straightness of your golf shots. It stabilizes the swing, increases lag created on your downswing, and maintains the proper wrist movement for consistent golf shots.
I often see golfers with a left-hand grip placement that is too strong or weak. Though that may work if you’re matching the grip strength of your left hand with the right hand, holding the golf club neutrally with the right hand but pairing that with either a strong or weak left hand grip will remove the left hand almost completely from squaring your club face, resulting in an overdominant right hand which leads to hooks and slices.
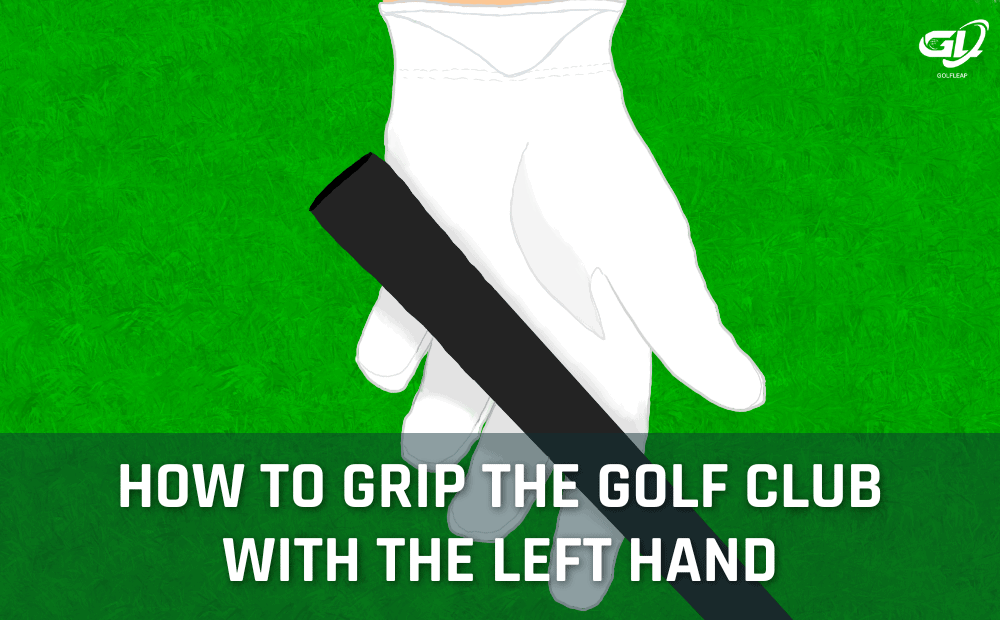
How to Hold the Golf Club With the Left Hand
1. Match Golf Club To Your Stance
Holding the golf club correctly starts with aligning the grip with your golf stance before you introduce the left-hand. To do this, we’ll use a 7-iron where we want to set up with the golf club center of your stance similar to how you would when addressing a golf ball. From there, place the sole of the golf club flush to the ground where the club face is square to your target and the shaft points towards your belly button. This creates a 45-degree angle between the ground and the shaft.
2. Choose Between the Palm-Finger or All-Finger Grip
From there, meet the left hand with the left side of the golf grip, and depending on your choice between a palm-finger or all-finger golf grip the steps may be slightly different. In this case, we would illustrate the more popular grip of the two, the palm-finger grip.
3. Run The Grip Diagonally Across Your Palm

For the palm-finger grip, we want to position the grip so that it runs diagonally from the first joint of the index finger to the fleshy part of your palm that is between the heart line and head line of your palm. We do this while leaving an inch of the butt of the grip ungripped.
4. Start With The Index Finger

The first phase of the grip starts with the index finger where we wrap the golf grip with the index finger while the rest of the fingers remain open. This will help to establish the rest of your grip for later.
To check that you’re doing this correctly, lift the club with just the left hand. You should feel the butt of the grip pressing upwards to the padding of the palm while the weight of your club is supported by the ‘U’ shaped notch created by your index finger where the grip rest above the middlemost section of your index finger. It should be noted that the club face should not tilt in any way from square while doing this, if so, you’re doing it wrong.
5. Close the Left-Hand
With the confusing part out of the way, it’s time to close the rest of your fingers except for the thumb. I recommend doing this while the club is still being lifted where you simply wrap the rest of your fingers around the grip. Once this is done, your left-hand should resemble a thumbs-up with the grip slotted in your hand.
6. Create the ‘V’ with the Thumb

The final step of the grip is to rest the thumb on the top of the grip with the thumb pointing down and towards the club head. Depending on your preference, you may prefer to rest the center of the thumb on the grip or the left cheek of the thumb instead. Both work, just find one that’s comfortable for you. The important element of this phase is to check that you’re creating a ‘V’ shape between the thumb and the index finger where both fingers should not be touching.
7. Leave an Inch Ungripped
Leaving an inch of the butt of the grip ungripped is important to balance the club, provide better control during the golf swing, and reduce any chances of injury. Once you’re set with the left-hand grip placement, ensure you leave an inch from the edge of your pinky to the butt of the golf club ungripped.
8. See Two to Three Knuckles
To make sure you’ve got the correct left-hand grip placement, rest the golf club back to where it would be on address. From there, check to see at least 2 to 3 knuckles on the left-hand as you grip the golf club at a neutral position. We illustrated this in the image above.
9. Have the Right Amount of Grip Pressure
As you introduce the right hand to complete your grip, you should check that the grip pressure of the left hand is on the ring finger with the proper amount of pressure equivalent to squeezing a soaked towel just to the point when it’s about to make a drip.
Summary of How to Hold the Golf Club With Your Left Hand
The left hand acts as the foundation of the golf grip and plays a crucial role in the accuracy and smoothness of your golf swing. Switching between grip strengths, grip pressure, and positioning is often not advised, and following the exact methods we mentioned here is the best way to start as a beginning golfer.
