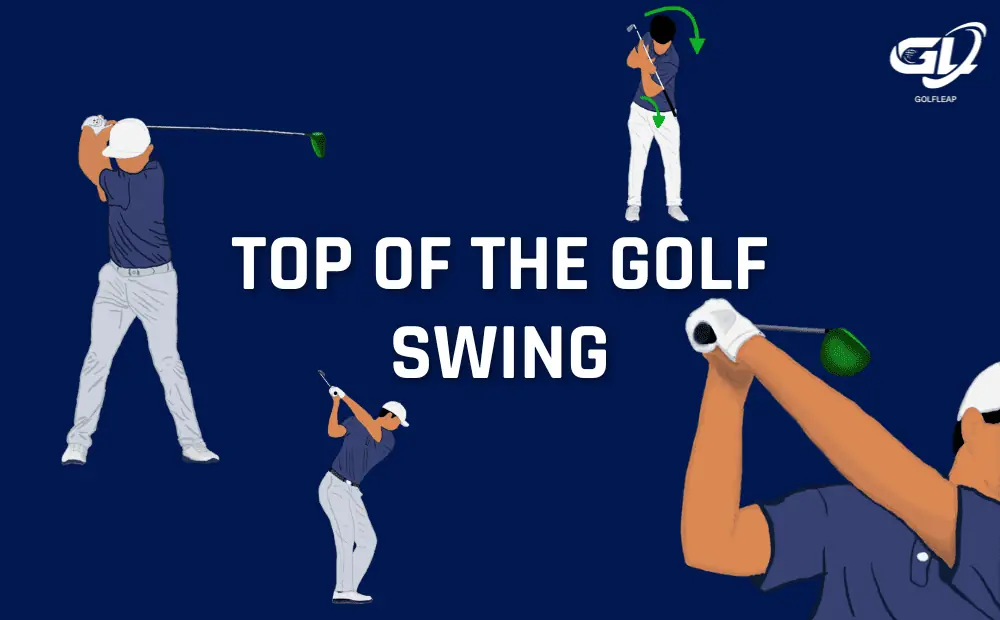
The top of the swing is the highest point of the golf swing and marks the only point in the swing where we are required to pause before transitioning from the backswing to the downswing.
When performed correctly, the top of the golf swing is athletic, aesthetically pleasing to the eye, and builds internal confidence that a great shot should follow moments later. When done incorrectly, golfers lose power and most of all consistency.
Here are the steps I take to make the proper top of the golf swing position:
- Maintain a Relatively Straight Left Arm
- Shaft Close to Parallel to the Ground
- Avoid Shifting All Your Weight to the Back Foot
- Maintain Your Spine Angle
- Left Wrist is Flat to Your Left Forearm
- Left Forearm Aligns With Shoulder To Avoid The High Hands
- Club’s Leading Edge Is Parallel With your Leading Arm
- 45° Rotation for Hips and 90°+ for Shoulders
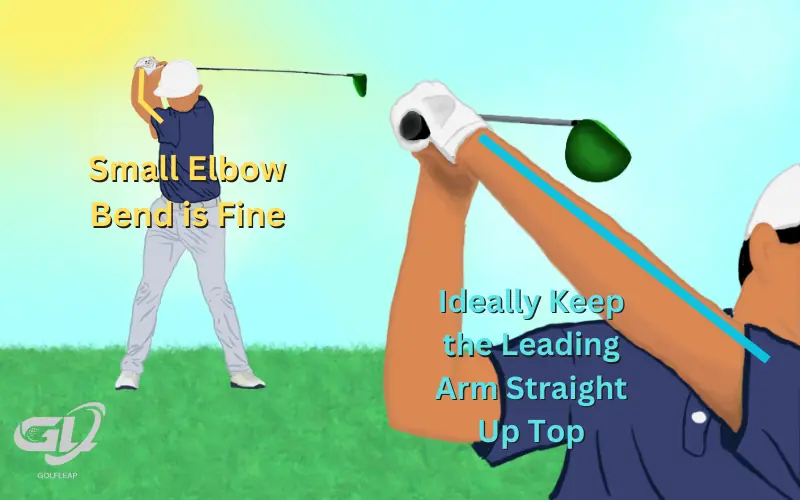
1. Relatively Straight Left Arm At the Top of the Swing
At the top of the golf swing, your leading arm (left arm for right-handed golfers) should stay relatively straight. That said, unlike the takeaway and most parts of the backswing, at the top, it’s common to add a slight bend to the elbow.
Keeping a straight/ relatively straight left arm at the end of the backswing creates a high level of predictability to your backswing length, providing more accuracy and distance control to your golf game.
2. Shaft Close to Parallel to the Ground
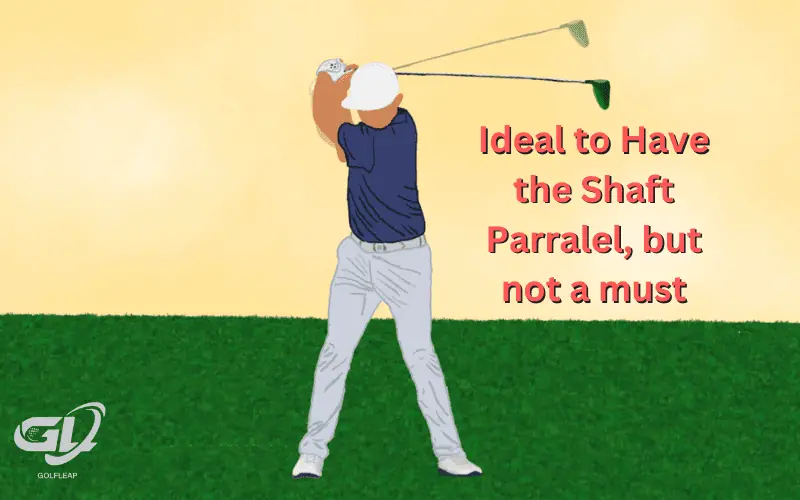
We’ve all seen clips of long-drive competitors swinging their club’s way past parallel in their backswings, but most people don’t acknowledge the fact these players rarely hit the ball straight.
The ideal ending position of the backswing causes the shaft to end up close to parallel with the ground. This maximizes our body’s comfortable power limits for our golf swing without adding inconsistencies caused by overswinging and also adds a natural wrist hinge to help generate power and complete your turn. It’s fine to be slightly less than parallel but ideally not more unless you’re John Daly. For Mark (founder of Golf Leap), he likes to keep his backswing short, similar to what Jon Rahm does though he can only wish to play like him.
3. Avoid Shifting All Your Weight to the Back Foot
In our experience, many golfers get confused about their weight distribution during the backswing by maintaining too much weight on their front foot or shifting too much weight to their back foot.
Beginning with roughly a 50/50 or 60/40 weight distribution between your front and back foot, feel a majority of your weight distributed to your back foot at the top of your swing, anywhere between 60% and 75% of your body weight depending on who you ask! That’s right, not 100%!
Detailed Guide Here: Golf Swing Weight Transfer
4. Maintaining Your Spine Angle
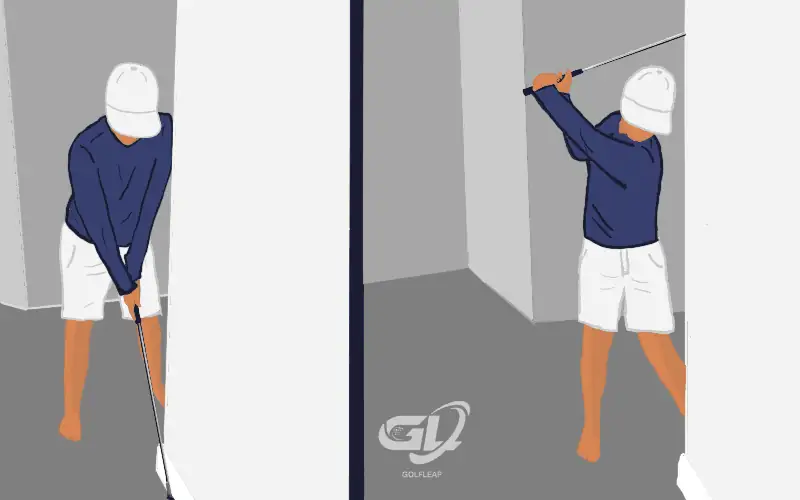
A problem we’ve struggled with on our journey to Scratch golf is maintaining our spine angle throughout the backswing.
When our spine angle gets taller during our backswing we raise the point where the club contacts the ball, causing thin shots. When we crouch down during the backswing we lower the point where the club contacts the ball, resulting in chunks!
Practice your backswing with your head gently resting against or near a wall while focusing on staying in the same position to emphasize the feeling of maintaining your spine angle!
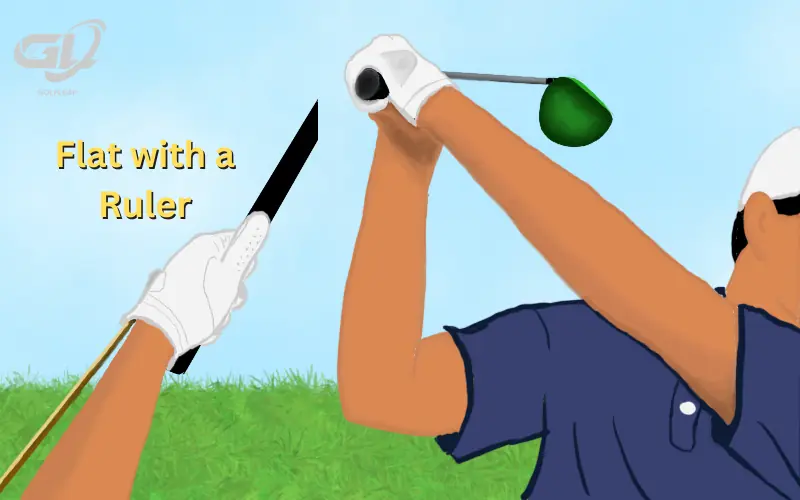
5. Left Wrist is Flat to Your Left Forearm
Unlike the bowing wrist or cupping wrist, a flat leading wrist at the top of your backswing helps keep your clubface square to your target for naturally straighter golf shots.
The feel and structure of a flat leading wrist at the top of your golf swing is similar to placing a non-rigid ruler in the back of your golf glove.
At the top of your backswing, the ruler should NOT touch your leading arm. This lets you know you’re maintaining a flat left wrist and aren’t cupping or bowing it too excessively! Additionally, the left wrist should be flat to the left forearm on top. This combined with a parallel shaft position in step 2 sets the perfect hand and wrist structure when you’ve reached the end of the backswing.
Detailed Guide Here: Golf Swing Wrist Action
6. Left Forearm Aligns With Shoulder To Avoid The High Hands
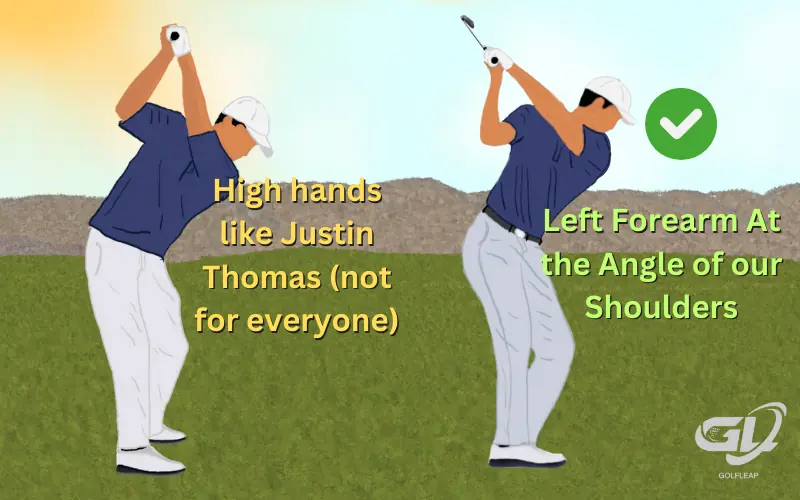
While having incredibly high hands at the top of the backswing worked well for Jack Nicklaus and currently functions great for Justin Thomas, this position often puts tons of stress on golfers’ backs and often causes slices due to limited mobility during the downswing.
The checkpoint we always use for our hand position at the end of the backswing is a straight left arm that matches the angle of our shoulders! A perfect middle ground between too high and too low!
Detailed Guide Here: Different Types of Golf Swings
7. Club’s Leading Edge Is Parallel With your Leading Arm
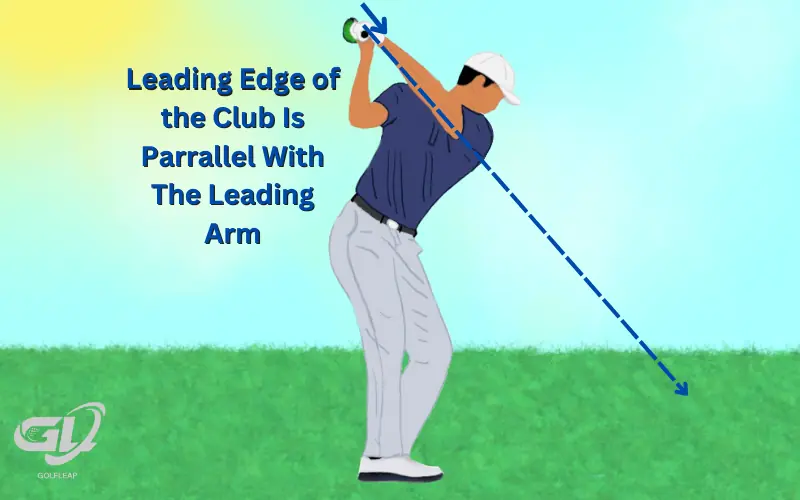
The leading edge of your club face should be parallel with the angle of your leading arm at the top of the backswing.
This checkpoint helps maintain a square clubface that’s on your intended swing plane (the path of least resistance for the golf club to travel) and keeps the club in a squared position for easier, naturally straighter golf shots!
To clarify things, when the clubface is pointed to the sky at the top of the backswing, it may look “open,” but it’s actually closed compared to your target. This creates hooks for many golfers and leaves the golf swing up to lucky-timing and extreme athleticism for good results.
When the clubface is pointed at the golf ball at the top of the backswing, it’s actually “open,” and usually results in slices for golfers due to steepening the angle the club contacts the golf ball.
Detailed Guide Here: []
8. 45° Rotation for Hips and 90°+ for Shoulders
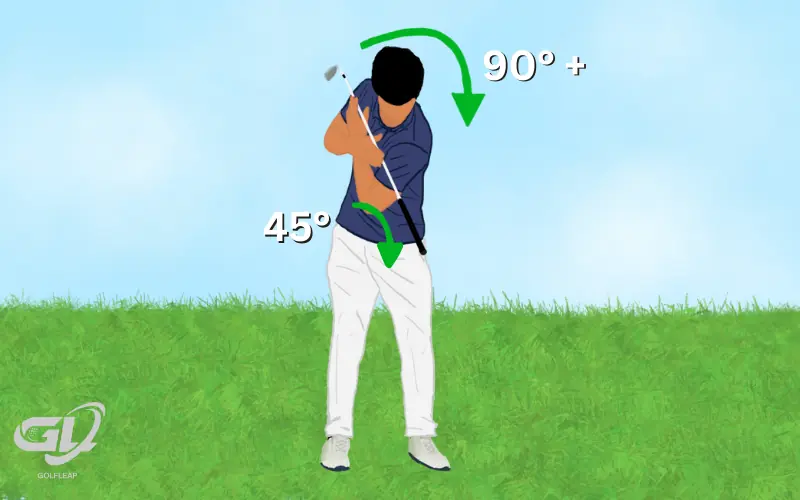
We like to imagine turning our hips half as much as our shoulders in the backswing (45° for Hips and 90°+ for Shoulders).
This allows us to use the big muscles in our back and shoulders to generate as much energy as possible while reducing our likelihood of swaying away or toward our target at the top of the backswing. If you’re unsure how much shoulder turn is enough, 90 degrees is having the club point to the ball. You can work out your hip rotation from there.
Drills To Eliminate Common Mistakes at the Top of the Golf Swing
How to Avoid An Over-the-Top Golf Swing
An Over-the-Top golf swing got its name due to the swing mistake golfers are making to achieve it.
When a player’s first move is to throw the club over the swing plane (path the club traveled on the backswing), they’re coming over the top of their swing plane which causes uncontrollable slice shots that have a wide-open clubface at impact.
While ensuring your position at the top of the backswing is following the checkpoints we defined above, try Sergio Garcia’s famous “Ring the Bell” drill to eliminate your over-the-top swing move!
Feel your trailing elbow drop straight downward from the top of the backswing as if you were ringing a bell by pulling the rope straight down. This causes our trailing arm to be underneath our leading arm at impact, resulting in the opposite of an over-the-top golf swing!
Pausing at the Top of Your Golf Swing
A growing trend amongst elite junior golfers and PGA TOUR professionals is pausing at the top of their backswings. Golfers who do this (Collin Morikawa, Hideki Matsuyama, etc.) say they benefit from much more control, consistency, and confidence over their backswings which helps their performance exponentially.
To discover if you’re a golfer that would benefit from pausing, experiment by trying half-speed golf swings while continually getting slower until you’re fully pausing at the top of your swing.
If this causes too much inconsistency or frustration, this swing move might not be the perfect fit for you!
