
The golf swing release is most easily described as the release of your body and swing’s accumulated energy at the right moment through impact for maximum power, speed, and efficiency for your golf shots.
Releasing the golf club properly is one of many golf swing fundamentals that requires the correct timing of your body movements (also called ‘correct body sequencing’) through impact and to your follow-through.
To increase your chances of releasing correctly, we must first find the release point of our golf swing. Once that’s established, we can evaluate the quality of our swing release by checking that:
- Feel a Release Down Your Target Line First
- Club Travels on an Inward Arc During the Full Swing Release
- Maintain Your Spine Angle to Release The Club Better
- Forearms Level Out & Toe of Club Points Upwards
- Leading Wrist Shifts from Flat/Bowed to Cupped, While Trailing Wrist Does the Opposite
- Your Trailing Shoulder and Chest Driving Toward Your Target Moves Your Head to Complete Release
- Avoid Chicken Winging Your Leading Arm for More Power During Your Release
Swing Release Basics: Mark Your Release Point
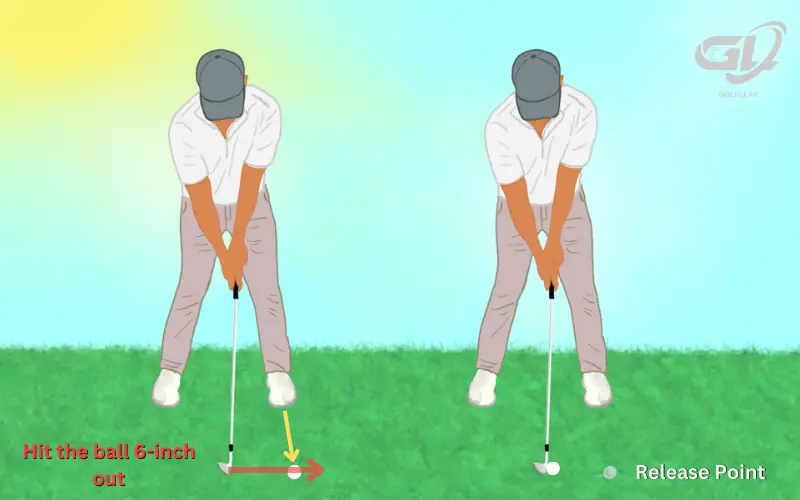
Before we begin, we should first find the release point of our swing. Golfers experience “release problems” when they release their swing energy too early or too late in relation to impact (causing slices, hooks, chunky shots, and thin shots).
To establish what the proper release sequence should feel like:
- Take a short iron in hand (8 – 9 iron) and create your standard stance with appropriate ball positioning as if you were about to hit a normal shot.
- Next, move the golf ball forward in your stance until it’s in line with the middle toe on your leading foot!
- Continuing with your normal stance and set-up, hit this golf ball that’s now 6 – 8 inches ahead of its normal position.
You won’t be able to create crisp, straight contact unless you release the club and your stored energy at the proper moment through and following impact.
Complete this exercise 5+ times before moving the ball back to its normal position and making your swing while imagining the ball is still forward in your stance.
This starting tip establishes the proper golf swing release feeling that aids the rest of our release advice!
How to Release the Club Correctly in the Golf Swing
1. Feel a Release Down Your Target Line First
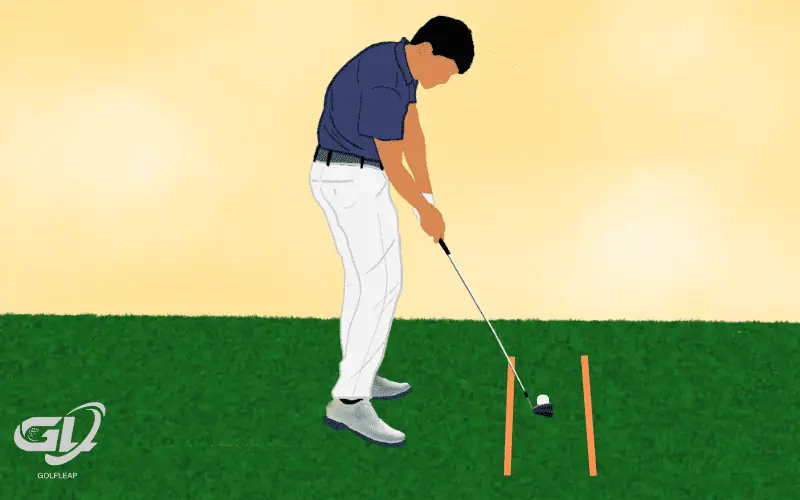
The first move of a proper golf swing release is contacting the golf ball and your club head moving down the target line for a brief amount of time immediately following impact.
The easiest way to accomplish this move and feeling is by placing an alignment stick or golf tee a few inches in front of your golf ball, pointed at your intended target, and trying to barely graze this object after you strike the golf ball!
This is a similar move and feeling as our previously described Release Point Exercise above!
2. Club Travels on an Inward Arc During the Full Swing Release
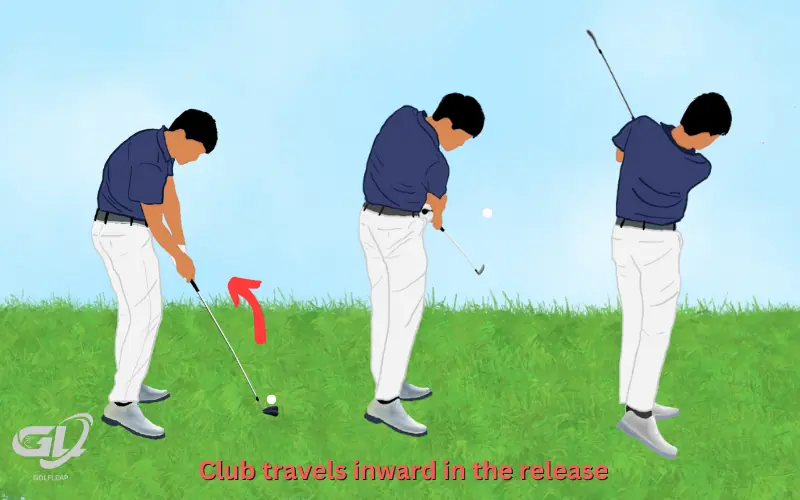
Golfers experience hosel-adjacent contact or weak toe strikes when their understanding of their swing arc (the path the golf club travels) gets confused related to their golf swing release.
Your golf club travels on a tilted circle during your swing and release (travelling within the golf swing plane), only staying down the actual target line for a brief amount of time through impact.
As a right-handed player, we should feel our hands moving toward our left side as we release the club and our power into our golf shot. This feeling of leftward movement aids every part of your release moving forward!
Detailed Guide Here: What is the golf swing plane?
3. Maintain Your Spine Angle to Release The Club Better
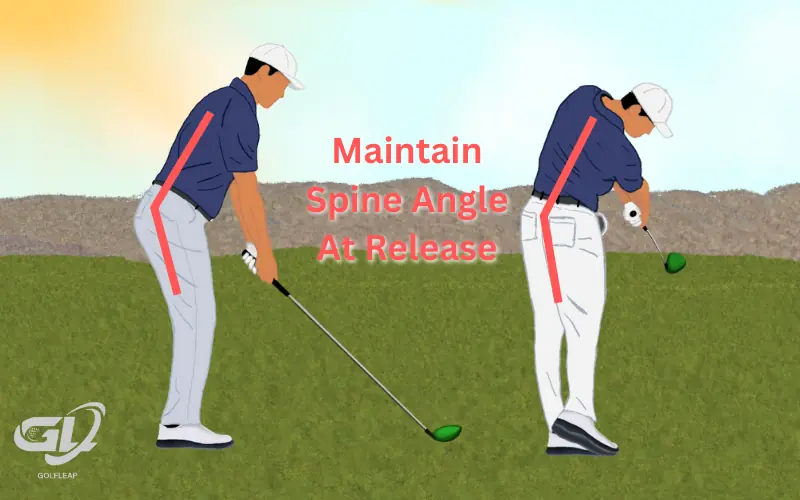
Experiencing the proper golf swing release sequence is much easier to accomplish when you maintain your spine angle through and following impact.
The only way we enjoy maintaining our spine angle is by practicing our impact position and follow-through position while our head rests against a wall (to keep our spine in the same location throughout the swing).
Detailed Guide Here: []
4. Forearms Level Out & Toe of Club Points Upwards
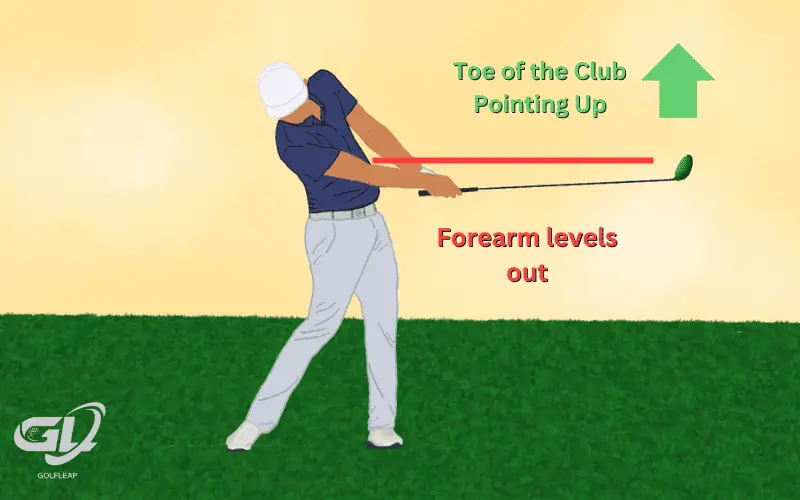
As your ball is sailing towards your target and you’re nearing the completion of your release, you should look for your forearms to level out as the club points in a nearly straight line away from you, with the club head’s toe pointing upward towards the sky.
The only way your forearms can level out while you also focus on maintaining your original spine angle is for them to move left from your target line (for right-handed golfers), hence an inward swing path mentioned earlier.
We recognize these checkpoints as symbols that we’re closing/squaring the club face on our club path arc at the appropriate time for naturally straighter shots!
5. Leading Wrist Shifts from Flat/Bowed to Cupped, While Trailing Wrist Does the Opposite
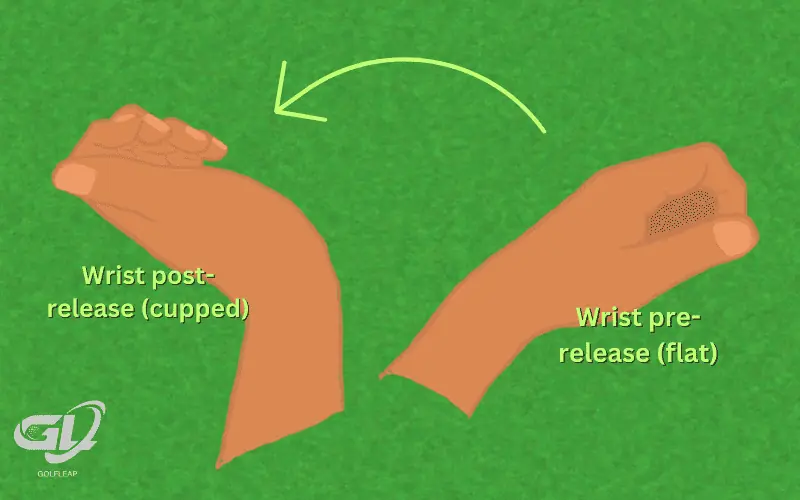
To avoid creating a “flippy golf swing”, “duck hooks”, or feeling like you’re flipping your wrists too quickly during your swing’s release, follow a tip we learned from our favorite golf instructor!
“Imagine you’re throwing a frisbee with your leading hand and skipping a stone with your trailing hand throughout the release.”
You should feel these wrist motions during your release for naturally straighter golf shots!
Detailed Guide Here: Golf Swing Wrist Action
6. Club is Ahead of the Hands at the Release
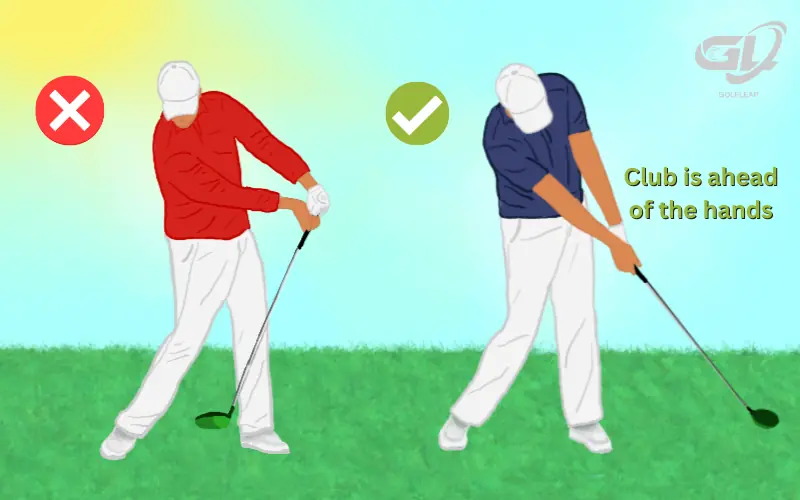
The only point when the club gets ahead of the hands is at the release of the swing. Ensuring the clubhead is ahead of the hands after hitting the golf ball ensures that you’re golf swing is respecting its swing plane, increasing the chances of you hitting the golf ball squared.
7. Trailing Shoulder and Chest Drives Toward Your Target Moving Your Head With it

While following our above tips will help ensure this motion happens correctly, incorrectly moving your head too early or too late can lead to neck and shoulder injuries (myself being guilty of both!)
We almost feel our trailing shoulder pulling the right side of our neck to initiate our head turn during the release, but this “trigger” or feeling could be unique to you.
Focusing on keeping a still head during your release can additionally help you avoid the classic “early extension” golf swing that causes weak slice-spin in most all amateurs!
8. Avoid Chicken Winging Your Leading Arm
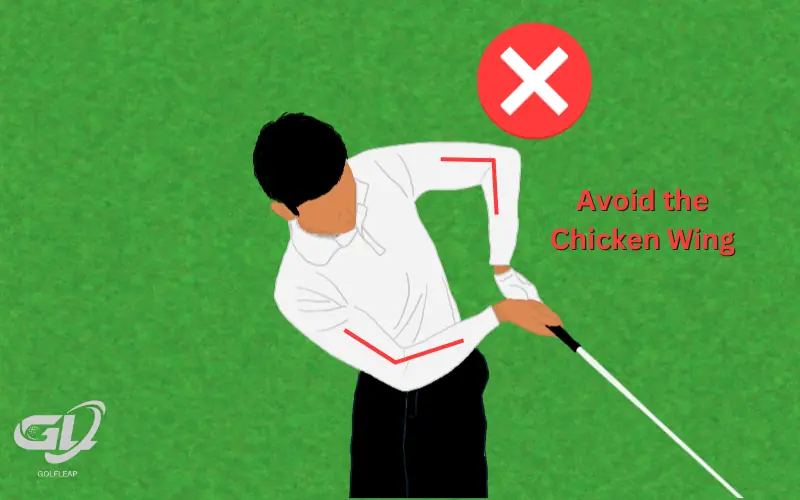
If you ever feel “stuck” during your golf swing release, it might be because your leading elbow is moving upward rather than around your body through the release, creating a chicken wing-like arm.
Chicken winging is a result of a lack of hand space throughout the golf swing, much of which can be attributed to a lack of arm hang during the golf setup which results in us pulling in our arms to avoid grounding the club, leading to thin or fat shots. To fix this, check your hands are hanging straight at address and really feel that you’re “throwing the club at the release”, keeping the arms as straight as possible (we’ve got a drill to fix this for you later).
Golf Swing Release Drills
Alignment Stick Behind Heels Drill
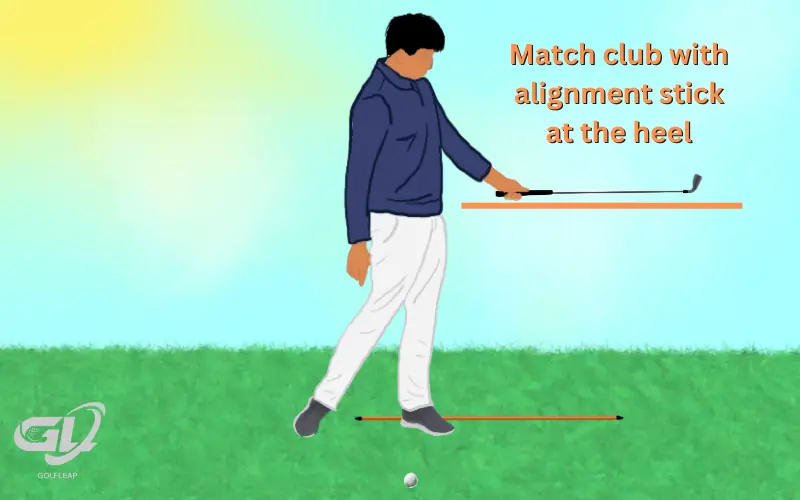
Place an alignment stick or golf club in a straight line touching your heels and pointed in the direction of your target while your create your normal stance.
This drill aims to simulate your normal golf swing and stop your follow through at the perfect release position, with the club parallel to the shaft/stick touching your heels when it’s horizontal with the ground.
This drill can be practiced from anywhere, and when repeated enough, it engrains our previously discussed swing release checkpoints into your actual golf swing!
Throw the Club Drill
If your golf swing release feels “guide-y” or like you’re trying to steer the ball to the correct location, you need the Throw the Club Drill.
While we wouldn’t recommend using your favorite golf club (you might check your local Thrift Store first), create your normal stance with a wide open yard or field in front of you and make your swing while focusing on throwing the club in front of you and toward your target after you make contact.
This drill forces you to feel full extension of your arms through the release (to get the golf club to go in front of you toward your target) and works wonders on your release pattern overall!
