The downswing is the section of the golf swing that brings the club down from the top of the swing to impact with the golf ball. It is simultaneously the fastest and hardest part of the golf swing for most amateur players to master.
We’ve personally experienced exponentially more control over our shot patterns, consistency, and ease-of-mind on the golf course once we established a base understanding of the proper golf downswing sequence.
To execute a proper downswing, follow these sequences:
- Initiate a Lateral Weight Shift Toward Your Target
- Unload the Hips First and the Upper Body Follows
- Let the Arms Drop Smoothly
- Dig Your Trailing Elbow Toward Your Trailing Hip
- Maintain Your Wrist Hinge in the Downswing
- Stay Centered Over The Golf Ball (Avoid Falling Backwards/Forwards)
- Feel Your Trailing Shoulder Attack the Golf Ball
1. Initiate a Lateral Weight Shift Toward Your Target
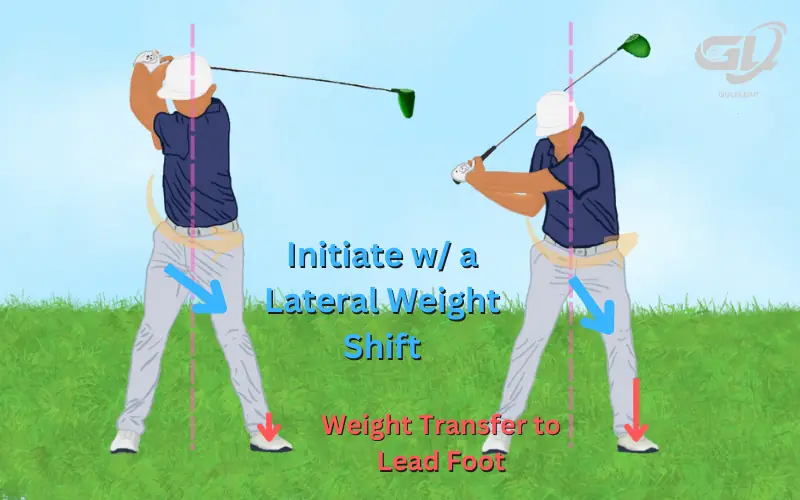
The first move we feel to start our downswing is a lateral weight shift toward our target.
Don’t think of this as “sliding” or “bumping” toward your target, think of this move as allowing your weight and stored energy to begin to heavily favor your lead leg as you swing down towards the target.
With Wedges, your weight should always favor your leading side. With Irons, your weight can transfer between your trailing side and leading side throughout your backswing and downswing. With the Driver, you’ll generally feel the biggest lateral weight shift toward your lead side throughout your downswing.
Detailed Guide Here: Weight Transfer in the Golf Swing
2. Unload the Hips First and the Upper Body Follows
As your weight is transferring to your leading side, you should also feel your leading hip rotating back and behind you, as Tiger Woods is always practicing on the driving range with exaggerated versions of this feeling.
Your leading hip “getting out of the way” as Tiger calls it, allows your shoulders, arms, and hands to have enough room in front of you to follow the proper downswing sequence.
3. Let the Arms Drop Smoothly
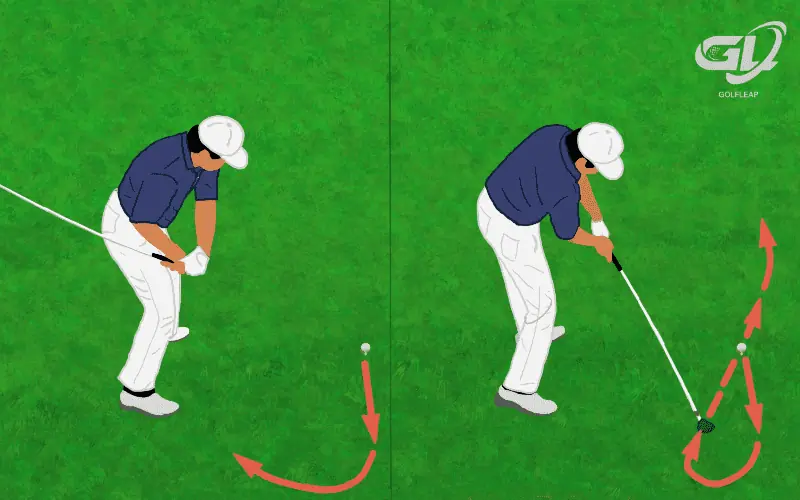
While our favorite golfers on TV make this look easy, allowing your arms to drop smoothly during the downswing gives you the greatest chance of hitting straighter shots at your target.
When you jerk your arms toward the golf ball during the downswing, you unintentionally influence the path your club travels to the golf ball, usually “over-the-top” of the path it traveled in the backswing causing slice spin.
Feeling a “Figure 8” backswing and downswing motion, as in, taking the club back straight and allowing your arms to drop to hit the golf ball from the inside quadrant (like Lee Trevino has instructed golfers to do for decades) is a great way to feel your arms dropping smoothly!
4. Dig Your Right Elbow Toward Your Trailing Hip
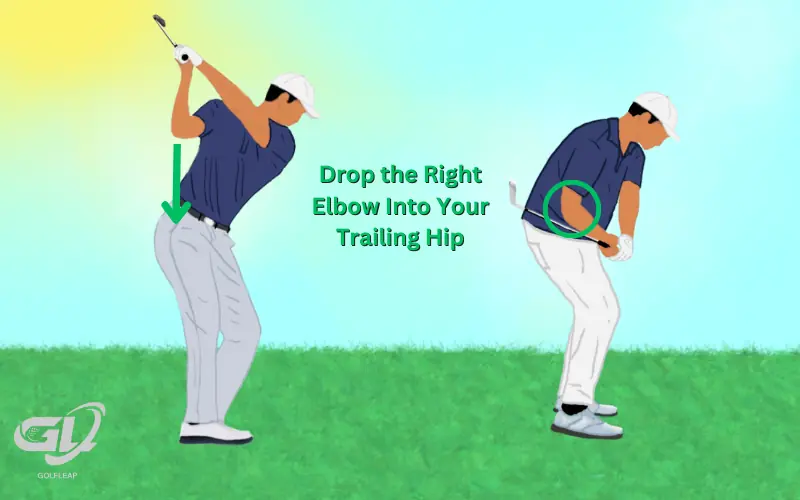
As we previously described, feeling your leading hip rotate out of the way while beginning the downswing will help your upper body work properly.
If you’re still struggling with slice spin or poor contact after focusing on our previous steps, feel as if your trailing elbow (right elbow for right-handed golfers) drops down to your trailing hip in the downswing.
This feeling/move helps keep your golf club traveling on the same plane as it traveled during the backswing or even underneath that plane, resulting in straight-to-draw-bias golf shots. This “Elbow to Pocket” move also helps golfers avoid the classic over the top golf swing that causes uncontrollable slices!
5. Maintain Your Wrist Hinge in the Downswing
I am guilty of having to practice this part of the downswing religiously for consistent results (I blame breaking my leading wrist as a child haha).
As your backswing is happening your trailing wrist should be hinging upward, as if you were dumping a bottle of water over your shoulder.
Maintain this wrist hinge during your downswing to keep your golf club moving on the proper swing plane and to avoid losing power you created in the backswing!
Detailed Guide Here: Wrist in the Golf Swing
6. Stay Centered Over The Golf Ball (Avoid Falling Backwards/Forwards)
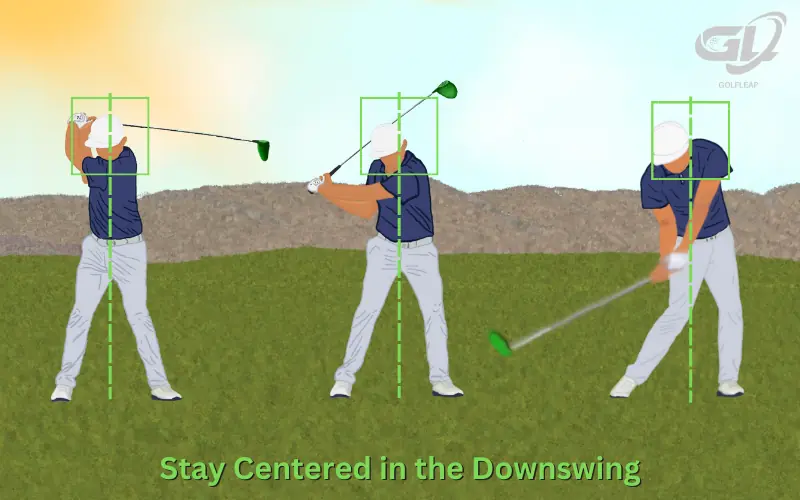
Golfers that lose their balance during the downswing are prone to experiencing unpredictable contact (both thin and chunky shots).
Staying centered over the golf ball and feeling as if your head is remaining in the same place (even though this is difficult to actually accomplish) during your downswing will lead to more crisp, ball-first contact that compresses the golf ball for maximum distance.
With the driver alone, allowing your head to actually stay behind the golf ball during the downswing will help you present as much loft to the golf ball with your driver as possible for higher launching, longer drives.
7. Feel Your Trailing Shoulder Attack the Golf Ball
A fantastic feeling for accomplishing the proper upper body sequence for your downswing is feeling your trailing shoulder move closer toward the golf ball as your downswing is occurring.
We practice this feeling by placing a golf club across our shoulders with the club head end facing behind us.
We then rotate our shoulders until the club head is pointing at the golf ball.
This drill also forces your trailing knee to shift toward your leading knee, helping your weight and energy transfer into the golf ball during your downswing.
Downswing Drills
If you couldn’t already tell, the golf swing’s downswing is chock full of many intricate movements that you have to perform in the correct sequence to produce great golf shots.
Here’s the drills we use when practicing at home, during poor or colder weather, or any time we have free time and want to work on perfecting our downswing!
Tiger’s Least Favorite Golf Drill: The Stop and Go Drill
When Tiger Woods first linked up with Butch Harmon to refine his natural talent and golf ability, one of the first drills Tiger worked on (and admittedly hated) was the “Stop and Go” drill.
Practice this drill by completing your backswing and pausing at this finishing position.
After pausing for a brief moment, initiate your downswing and focus on making crisp contact.
You’ll find this drill is quite difficult and requires perfect/picturesque downswing upper and lower body sequencing to result in straight ball flights at your intended target.
After practicing this drill, the feeling of a perfectly sequenced downswing will translate to your normal swing!
Gary Player’s Step-Through Drill – Happy Gilmore Drill
Do you know you could hit the ball farther than you currently do? Do you feel like you’re struggling with your weight transfer with your longer clubs?
If so, Gary Player’s famous “Step-Through Drill” will fix that uncertainty in no-time.
Create your standard stance and move your leading foot until it’s nearly touching your trailing foot.
Take your normal backswing and step toward your target with your leading foot as your downswing begins while also making contact.
This drill gives golfers an exaggerated version of the proper weight shift feeling we’re hoping to accomplish in the downswing.
